
SOLVE MY CUBE GUIDE
How to solve a 3×3 Rubik’s Cube: a beginner’s guide
You can learn to solve your cube without a solver choosing the moves for you. We will build it one layer at a time, with a place to stop and check after every step.
Keep this guide open beside your cube. Try one small step, check it, then carry on. There is no need to remember every move today. This method works with a standard 3×3 Rubik’s Cube and compatible puzzle cubes.
Before you turn: pieces, not stickers
A sticker belongs to a little piece. You cannot move the white sticker away from the other colours on that same piece.
- Centres have one colour. They tell you the colour of each face. Their positions relative to one another do not change.
- Edges have two colours. A white-and-green edge belongs between the white and green centres.
- Corners have three colours. A white, green and orange corner belongs where those three faces meet.
Our diagrams use white opposite yellow, green opposite blue, and red opposite orange. With white underneath and green facing you, orange is on the right in these pictures. If your cube has a different colour scheme, follow its centres. Grey tiles in the pictures mean “ignore these for now”, not a colour you need on your cube.
Can I move just one piece without spoiling everything?
One face turn moves several pieces. The trick is to use a short sequence that moves a piece into place and brings the protected pieces back. Think of opening a gate, moving something through it, then closing the gate.
Check at the end of a complete sequence, not halfway through. A solved piece may move away for a moment. The instructions will say which parts should be restored and when.
How to read a move
| Letter | Face to turn |
|---|---|
| R / L | Right / left |
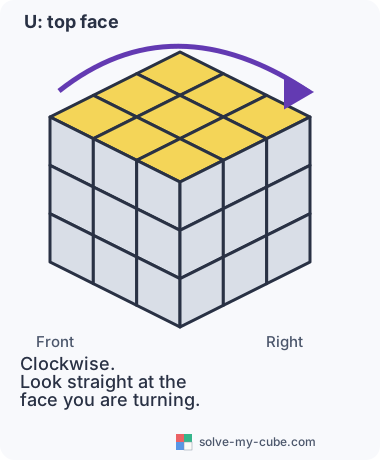
| U / D | Top / bottom |
| F / B | Front / back |
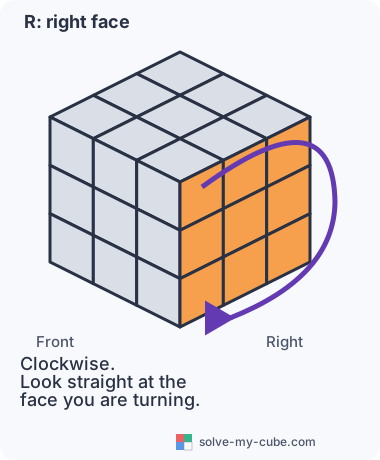
- R means turn the right face a quarter-turn clockwise.
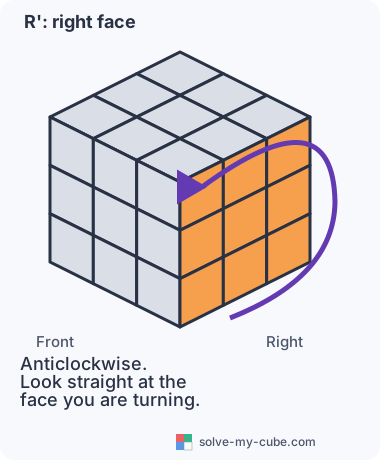
- R' means turn it a quarter-turn anticlockwise. The little mark is called a prime.
- R2 means turn it halfway round. Either direction gives the same result.
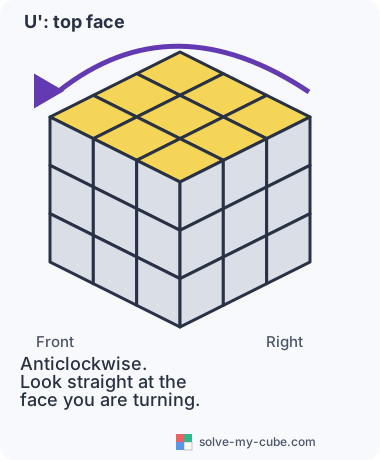
Clockwise always means as if you are looking straight at that face. For U, imagine looking down at the top. For D, imagine looking up at the bottom. Do not judge every turn from the front of the cube.
Turning the whole cube is different. It changes which side you call the front. We will say when to do that. More examples are in our move notation guide.
Try four moves, then undo them
On any cube, do R U R' U' slowly. Then undo the whole sequence with U R U' R'. Your cube should be exactly as it started. Undo means reverse the order AND reverse each turn.
1. Make a white daisy
Hold the yellow centre on top and the white centre underneath. Put four white edge stickers around the yellow centre. Leave the corners alone for now.
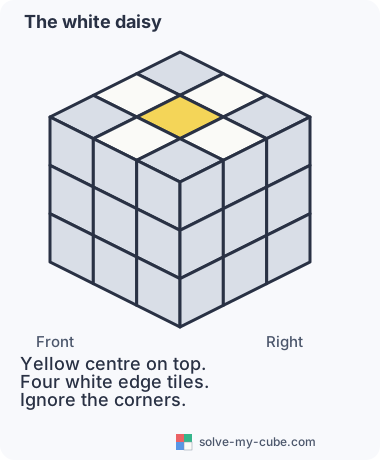
Find a white edge, then choose the case that matches it:
- White points down: turn the whole cube, keeping yellow on top, until that edge is at the front-bottom. Use U turns to make the front-top petal space empty. Turn the front face halfway round,
F2. White now points up. - White is in the middle row of a side: turn the whole cube until that white sticker faces you. If it is on the right, make the top-right petal space empty with U turns, then do
R. If it is on the left, make the top-left space empty, then doL'. - White faces outwards in the top or bottom row: hold that sticker at the front. If it is in the bottom row, first make the front-top petal space empty with U turns. Do
Fto move the edge into the middle row. Now follow case 2.
An “empty” petal space just means its top sticker is not white. Before moving a new petal upwards, turn U to move an existing petal out of its way. Turning U does not remove petals from the top.
2. Turn the daisy into a white cross
Keep yellow on top. We will send each petal down to the white centre, but first we must line up its other colour.
- Choose a white petal. Look at the other sticker on that same edge.
- Turn only U until that side sticker sits directly above its matching centre. For a white-and-green edge, green must sit above green.
- Turn the whole cube around, keeping yellow on top, so this matched side faces you.
- Do
F2. The white edge goes down into the white cross. - Repeat for the other three petals.
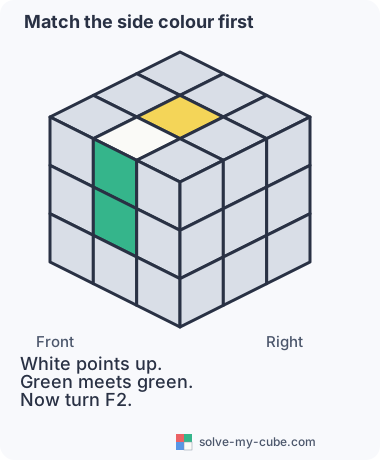
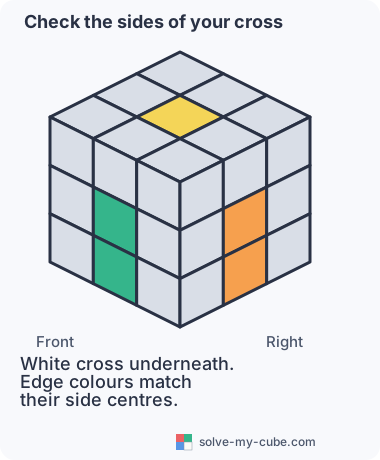
If an edge is wrong, hold its side at the front, do F2 to lift it back up, line up its side colour with U, then send it down at the correct centre.
3. Finish the white corners
Keep white on the bottom. Find a corner with white on it. Use its other two colours to find its home between the side centres.
- If the corner is in the top layer, turn U until it sits directly above that home. White can point in any direction.
- Turn the whole cube around, keeping white underneath, so the home is at the bottom-front-right. The piece you want is now at the top-front-right.
- Do the four moves below. Stop after the fourth move and look.
- If the target corner is not solved in its bottom home, repeat the same four moves with the same front. It can take up to five repeats.
R U R' U'Right clockwise, top clockwise, right back, top back.
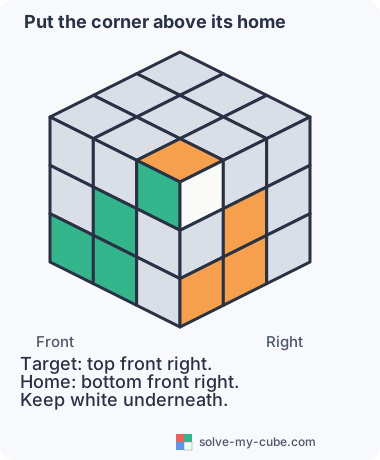
Is a white corner trapped underneath, but wrong? Rotate the whole cube to put that wrong corner at bottom-front-right. Do the four moves once to lift it into the top layer. Then find its proper home and follow the steps above. Do not take out a corner that is already correct.
This sequence keeps the white cross and the other bottom corners intact at the end of each group. The top and middle layers are still our working space, so they are allowed to change.
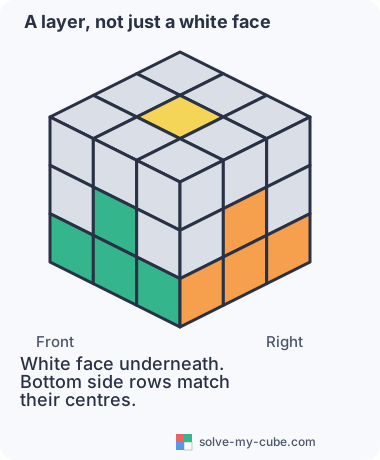
4. Fill the middle layer
Keep white down and yellow up. Find a top-layer edge with no yellow. Its two colours belong between two side centres.
- Turn U until the edge’s outward-facing sticker matches the centre below it.
- Turn the whole cube so that matched side faces you.
- Look at the edge’s top sticker. Does its matching centre sit on the right or the left?
- Use the matching sequence below. Keep the same front throughout all eight moves.
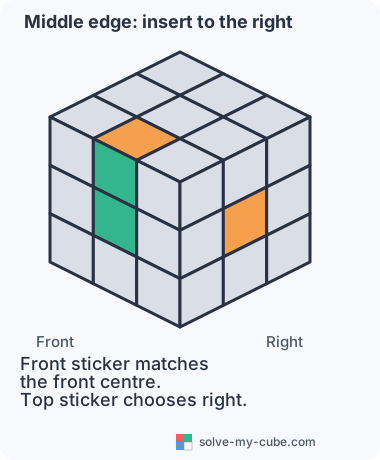
The edge belongs on the right
U R U' R' U' F' U FMove the edge away, open its space, then put the white corner back.
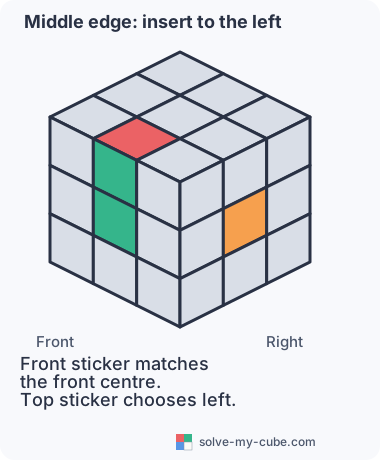
The edge belongs on the left
U' L' U L U F U' F'This is the matching sequence for the left-hand space.
No useful edge on top? A non-yellow edge is stuck in the middle, either flipped or in the wrong home. Put that wrong slot at front-right and do the right-hand sequence once. It swaps in a top edge and brings the trapped one out. Now line up the freed edge and insert it properly. Do this only at a wrong slot.
The first layer may look broken halfway through the eight moves. Finish the sequence before checking it. It should be restored, along with the other middle edges you have already solved.
5. Make a yellow cross
Now look only at the four top edges. Ignore yellow corners, even if they make a different-looking shape.
- Cross: all four edge stickers are yellow on top. Skip to step 6.
- Line: turn U until the yellow line runs left to right.
- L shape: turn U until the yellow edges are at the back and left.
- Dot: only the centre counts as yellow. Any side can face you.
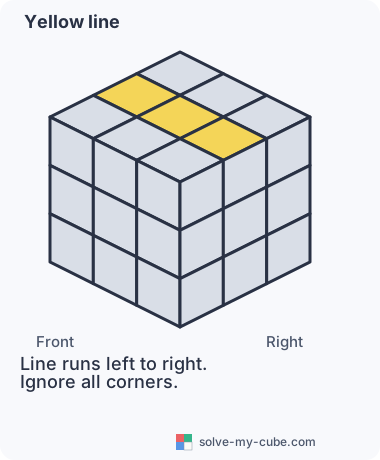
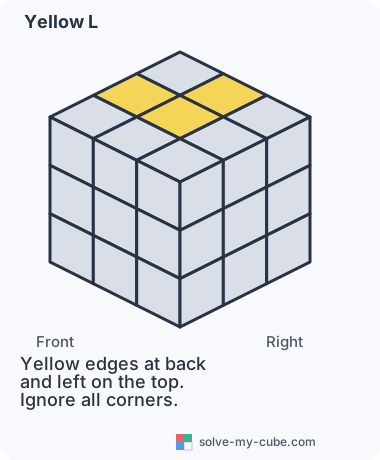
Hold the pattern as described, then do:
F R U R' U' F'Open the front, do the four-move corner pattern, close the front.
Look again. Set up the new pattern before repeating. A dot needs more than one go; you are not meant to make the whole cross in a single sequence.
6. Match the yellow edges to their centres
Turn U and check how many top edge side stickers match the centres below them. Try up to four top positions. Find two matches or all four.
- All four match: skip to step 7.
- Two neighbours match: rotate the whole cube, keeping yellow up, so those matching edges are at the back and right.
- Two opposite sides match: use the sequence once with any side at the front. Then turn U to find two matches again. They will be neighbours. Put them at back and right and repeat.
R U R' U R U2 R' UThe final U is part of this sequence. Do not leave it out.
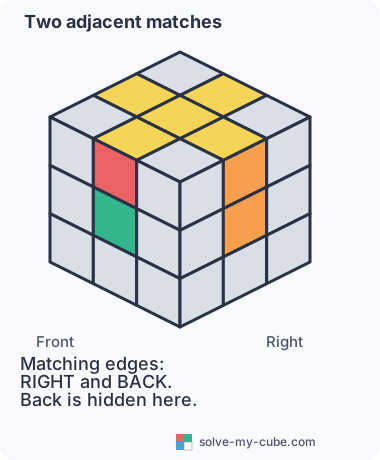
7. Find the right homes for the last corners
A corner is in its home if its three colours match the three surrounding centres. It may still be twisted. For example, yellow-green-orange belongs between those centres even when its yellow sticker faces sideways.
- Check all four top corners, using all three colours on each one.
- If all four are in their homes, go to step 8.
- If one is in its home, turn the whole cube, keeping yellow up, to put that corner at top-front-right. Do not turn U to move it there.
- If none is in its home, do the sequence below once from any front. Check again, then put the correct corner at top-front-right by turning the whole cube.
- With that correct corner at top-front-right, do the sequence once. Check the other three corners. If needed, do it once more from the same front.
U R U' L' U R' U' LThis keeps the top-front-right corner in place and cycles the other three.
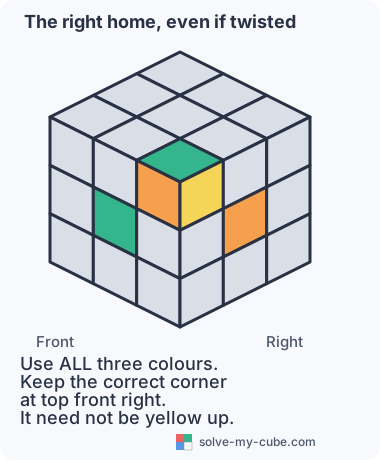
8. Turn the last yellow stickers upwards
This is the step where many beginners think they have broken the cube. The lower layers will temporarily look scrambled. They come back when you finish all four top corner positions correctly.
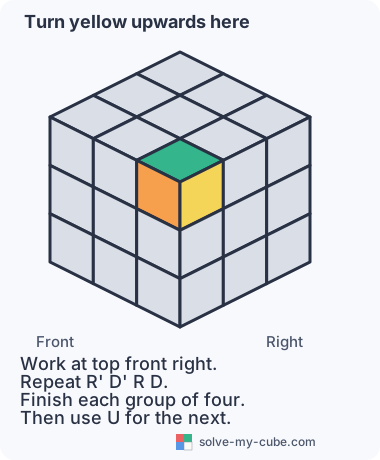
- Keep yellow on top. Choose a front and keep it for this entire step. You may turn the whole cube once before starting to put an unsolved yellow corner at top-front-right.
- At top-front-right, do
R' D' R D. Finish all four moves, then look at that corner. - If its yellow sticker is not on top, repeat the same group. A corner that needs twisting takes two or four complete groups. Do not stop halfway through a group just because yellow flashes into view.
- Once yellow points up there, turn only U once to bring the next corner into top-front-right. Do not rotate the whole cube.
- If this new corner is already yellow up, leave it alone. Otherwise repeat the four-move group until yellow points up.
- Visit all four corner positions this way, using one U between them. After the fourth position, use U to line up the side rows again.
R' D' R DRight anticlockwise, bottom anticlockwise, right clockwise, bottom clockwise.
If something does not match
- White face complete, side rows mixed: the corners are in wrong homes. Return to step 3 and check all three colours on each corner.
- First layer broke during a middle edge: finish the full eight moves. If it is still wrong, check your turning direction and starting position.
- Yellow cross will not form: count edges only. Set up the line left-to-right or the L at back-left before each try.
- The last corner step went wrong: common causes are missing the final D, turning the whole cube between corners, or turning U before the working corner is yellow up. If you know the exact moves you made, undo them in reverse order. Otherwise start again from the first unfinished stage.
A cube scrambled only by turning its layers is solvable. If pieces were pulled out or stickers moved, see our guide to impossible cube states. Do not twist a physical corner to repair an ordinary solving mistake.
How to practise without starting over every time
Once you have a first layer, put an already solved bottom corner at front-right and do R U R' U' once. You have made a small practice case. Find that corner on top and put it back using step 3. The other white corners and cross stay protected after each full group.
Practise the cross on its own, then the corners, then one middle edge. A little practice with one idea is easier than trying to memorise the whole page at once. The 3×3 solver is still there if you want help getting back to a solved cube.
This is an original beginner lesson with original diagrams. The move sequences and their checkpoints are tested against our cube model. For a different teaching approach, see the official Rubik’s solve guide.
Ready for your next move?
Enter your cube’s colours and follow a solution at your own pace.
Open the cube solver