
SOLVE MY CUBE GUIDE
How to solve a 2×2 Rubik’s Cube: a beginner’s guide
A 2×2 cube has just eight corner pieces. We will solve one layer, put the remaining corners in their homes, then turn their yellow stickers upwards. You will choose the moves yourself.
Keep the guide beside your cube and work through one step at a time. You do not need to be fast, and you do not need to memorise the moves before you begin. This lesson works with a standard 2×2 Rubik’s Cube and compatible puzzle cubes.
Looking for help entering colours into our tool instead? Use the separate 2×2 solver walkthrough. This page teaches a hands-on method that does not need the solver.
Before you turn: follow the whole corner
Each corner has three stickers that always travel together. A white-green-orange corner stays that same piece however you turn the cube.
A 2×2 has no centre pieces and no edge pieces. That means there is no white cross to make. The white cross is a 3×3 step. On a 2×2, we go straight to the corners.
Our pictures use white opposite yellow, green opposite blue, and red opposite orange. We start with white underneath, green at the front and orange on the right. Later pictures clearly label a change of front when we turn the whole cube. A face colour means the colour we are building there, not that every sticker already matches. Check your cube’s colour scheme or maker’s picture if it uses different colours. You can apply the same moves with the corresponding colours.
A white face is not always a solved layer
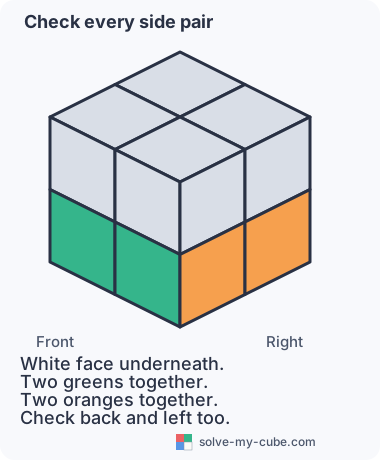
Four white stickers together are a good start. But their side colours must match too. Along the white layer, you need a pair of greens on one side, a pair of oranges on the next, and matching pairs on the other two sides.
Why can’t I move just one corner?
A face turn moves four corners. A short move sequence lets us move our target and return the other important corners. So a solved corner may leave its place briefly. Finish the whole sequence before checking the protected pieces.
We will use the top layer as our working space while building the bottom layer. You may change pieces on top because they are not solved yet.
Read these move letters
| Move | What to do |
|---|---|
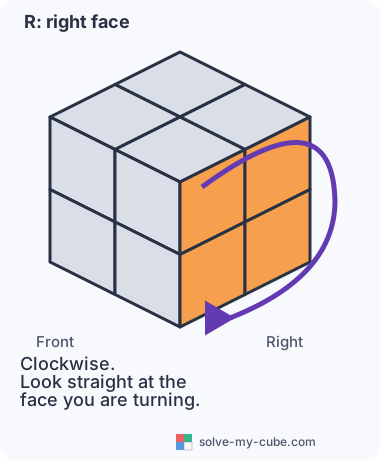
| R | Turn the right face a quarter-turn clockwise. |
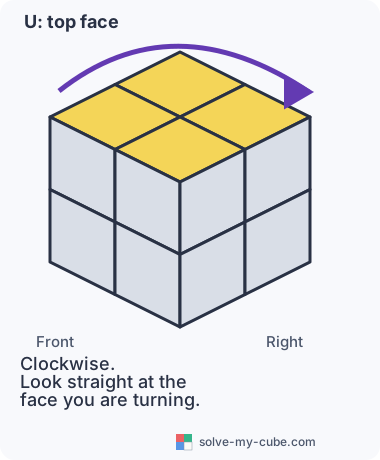
| U | Turn the top face a quarter-turn clockwise. |
| L | Turn the left face a quarter-turn clockwise. |
| D | Turn the bottom face a quarter-turn clockwise. |
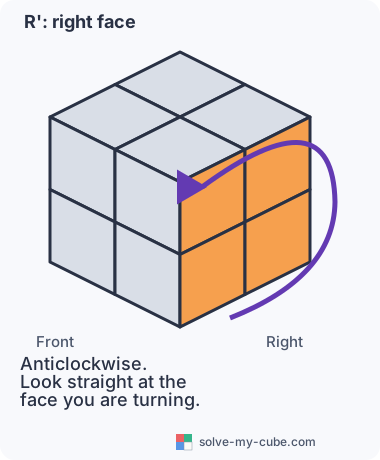
| A prime, such as R' | Turn that face a quarter-turn anticlockwise. |
| A 2, such as U2 | Turn that face halfway round. |
Judge clockwise as though you are looking straight at the face you are turning. For D, imagine looking up at the underside. Keep the whole cube still during each sequence, even when you turn the bottom face.
To change which side faces you, rotate the whole cube. That is different from turning just one layer. We will name it clearly when you need it.
A quick practice before you start
Do R U R' U' slowly. Then undo it with U R U' R'. You should be back where you started. An undo reverses both the order of the moves and their direction.
Each arrow shows the turning direction. Turn the whole face, with all four stickers.
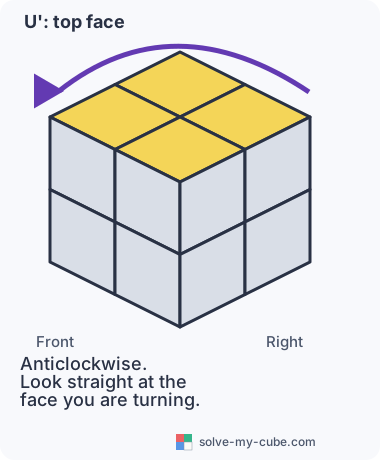
1. Build the white layer
We will start with one white corner, then add its three neighbours. A corner means the whole little block with three stickers, not just one square.
A. Choose your starting corner
- Find the one corner with white, green and orange on it. Follow the stickers around the same little block to check all three colours.
- Pick up the whole cube and turn it in your hands until that corner’s white sticker faces the floor. You do not need to turn any layers yet.
- Keep that white sticker facing down. Turn the whole cube around until the corner’s green sticker faces you and its orange sticker faces right. That piece is now the bottom corner nearest you on your right.
That is your first solved corner. The rest of the cube can be mixed up. You are using this one piece to decide where the other colours will go.
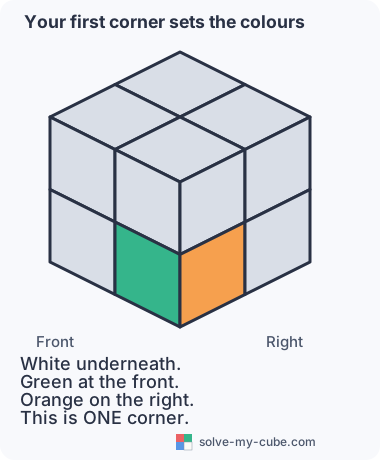
B. Make room beside it
The next piece will be white-orange-blue. It shares orange with your starting corner, so their orange stickers will sit side by side.
- Keep white pointing down and rotate the whole cube a quarter-turn so the orange sticker comes towards you. The green sticker now faces left.
- Your starting corner is now at bottom-front-left. Leave it there. The space immediately to its right, at bottom-front-right, is the home for white-orange-blue.
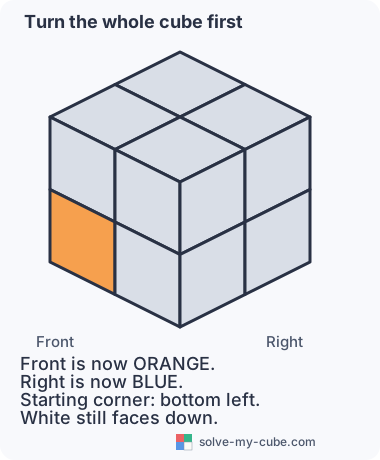
C. Bring white-orange-blue above its home
- Find the white-orange-blue corner. If it is in the bottom layer, use the help box below first. If it is already correctly solved in its home, skip to part E.
- If it is in the top layer, turn only the top layer until the piece is at top-front-right. This means the top corner nearest you on your right, directly above the space you want to fill.
- Its white sticker can face up, towards you or to the right. Any of those is fine. Check the other two stickers belong to the same piece: orange and blue.
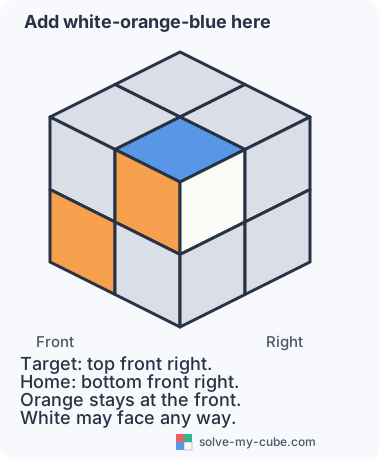
The corner I need is in the bottom layer
If it is already in its correct home with white down, leave it alone. Otherwise:
- Rotate the whole cube, keeping the bottom underneath, until the unwanted or twisted corner is at bottom-front-right.
- Do
R U R' U'once, all four moves. That corner moves into the top layer. The other bottom corners return to their places. - Rotate the whole cube back to your working view. For our first example, that means orange at the front, blue on the right, and your starting corner at bottom-front-left.
- Turn only the top layer to put the target at top-front-right. Continue with part D.
Do not lift out a correctly solved corner just to make space.
D. Use four moves to put it in
Keep the cube facing the same way. Do these four quarter-turns:
R U R' U'From your front view: right column up, top row left, right column down, top row right.
- R: turn the right layer so its front stickers move up.
- U: turn the top layer so its front stickers move left.
- R': turn the right layer back down.
- U': turn the top layer back to the right.
Those directions describe the stickers you see at the front. Each turn moves a whole layer, not just the two visible stickers.
After all four moves, check bottom-front-right. Is your white-orange-blue corner there, with white down, orange towards you and blue to the right?
- Yes: stop. You now have two neighbouring corners solved.
- No: repeat the same four moves, keeping the same front. Check again after the whole group. It takes one, three or five groups for a white corner that started directly above its home.
Do not turn U separately between these repeats. The target will move away and come back as you repeat. Also, do not stop just because a white sticker appears underneath: it must be the correct three-colour corner.
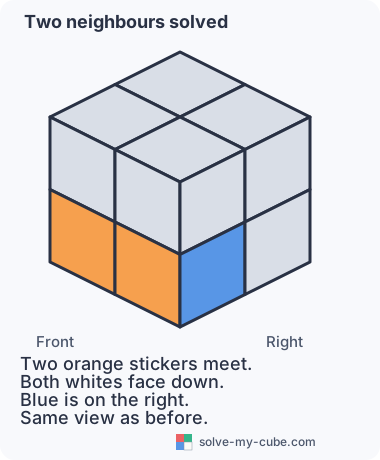
E. Add the last two white corners
Use the same idea twice more. Before each new corner, turn the whole cube so the next empty home is at bottom-front-right. Keep the white stickers underneath.
- White-blue-red: rotate the whole cube so blue becomes the front colour and orange moves to the left. Red is now on the right. Add this corner to make a blue pair along the front bottom row.
- White-red-green: rotate the whole cube again so red becomes the front colour and blue moves to the left. Green is now on the right. Add this corner to make a red pair along the front bottom row.
For each target, bring it to top-front-right, then repeat R U R' U' until it is solved underneath. Use the help box if it is trapped in the bottom layer. Skip a target if it is already solved.
You can use this method with any starting corner once you feel comfortable. The useful question is: which side colour does this new corner share with its solved neighbour? Those two stickers need to sit together.
2. Put the yellow corners in their homes
To match the next picture, rotate the whole cube until the green bottom pair faces you and the orange bottom pair is on your right. Keep white underneath. This changes your viewpoint, not which pieces are solved.
Keep the white layer underneath. The colours of its matching pairs tell you the colours of the side faces, like centres do on a 3×3.
A yellow corner is in its home when its other two colours match the two sides below it. Yellow does not have to point up yet. For example, yellow-green-orange belongs above the place where your green pair meets your orange pair.
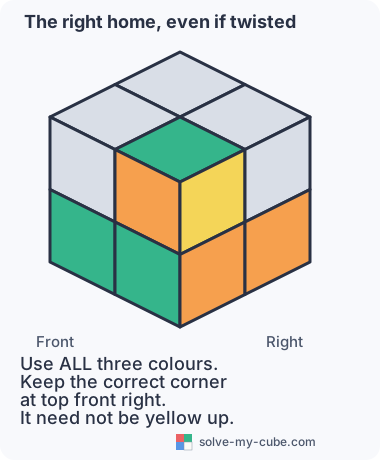
First, find one correct corner or all four
- Count how many of the four top corners are in their homes.
- If all four are in their homes, go straight to step 3.
- If exactly one is in its home, use the instructions below.
- If you have zero or two, turn U a quarter-turn and count again. Try all four top positions.
- If none of those positions gives exactly one or all four, keep white down and do the sequence below once from any front. Then try the four U positions again.
That last case is normal on a 2×2. Two correct corners can look promising, but this particular sequence needs one correct corner to use as its fixed point.
Keep the correct corner and move the other three
- With exactly one corner in its home, turn the whole cube, keeping white down, until that corner is at top-front-right. Do not use U to put it there, because that moves corners away from their homes.
- Do the following eight moves, keeping the same front.
- Check the homes of all four corners again. If the other three are not right yet, repeat the same sequence once more.
U R U' L' U R' U' LThe top-front-right corner stays put. The other three trade places.
Read it in two small groups: U R U' L', then U R' U' L. A brief pause between the groups is fine, but finish all eight moves before checking.
3. Turn yellow upwards
We will twist the yellow corners one at a time. The white layer will look broken while you work. That is expected. The moves for the later corners bring it back. Do not try to repair it halfway through.
A. Choose your working corner, then keep that front
- Start with white underneath. Find a top corner whose yellow sticker faces sideways.
- Rotate the whole cube, keeping white underneath, to put that corner at top-front-right. If all four yellow stickers already point up and the side colours match, your cube is solved.
- Now keep this same side facing you until the entire cube is finished. You may find it helpful to keep your left hand holding the left half of the cube.
From now on, “top” and “bottom” mean positions in your hands. Do not turn the whole cube to put white underneath again when the white stickers move during the sequence.
B. Twist one corner with four moves
R' D' R DFrom your front view: right column down, bottom row left, right column up, bottom row right.
- R': right down. Turn the right layer so its front stickers move down.
- D': bottom left. Turn only the bottom layer so its front stickers move left.
- R: right up. Turn the right layer so its front stickers move up.
- D: bottom right. Turn only the bottom layer so its front stickers move right.
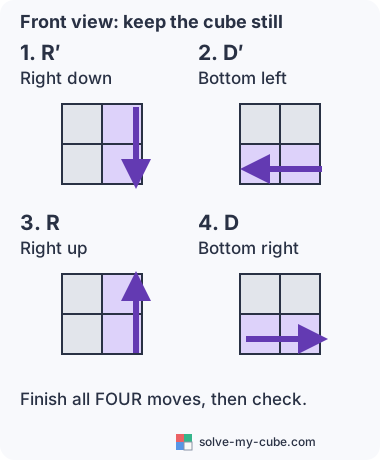
Say “down, left, up, right” and finish all four. Even if yellow seems to reach the top during a group, do the last move before checking.
Look at the upward-facing sticker of the top-front-right corner. If it is not yellow, do another complete group. A yellow corner that needs twisting takes two or four groups. Keep repeating on this same working position until yellow faces up there.
The rest of the cube can look worse after the first group. Keep going. Do not switch to another corner after just one group, and do not use the first-layer sequence here: this step is R' D' R D, with bottom turns.
C. Bring the next corner to your hand
- Once yellow points up at top-front-right, turn only the top layer once with U. Its front stickers move left. This brings the next corner into the same working position.
- If that corner is already yellow up, leave it alone. Otherwise repeat the four-move group until it is yellow up.
- Use one U turn to move on again. Check all four top positions, including any that started yellow up. Never rotate the whole cube between corners.
- After checking the fourth position, turn U once more. You have now made four U turns in total, bringing the top layer back into line.
You can count the positions on your fingers: first corner, U, second corner, U, third corner, U, fourth corner, U. Some corners need no twisting moves, but you still visit them.
Yellow is solved, but the bottom still has wrong stickers
That is not the intended finishing state. Do not keep applying the twisting sequence to yellow-up corners to try to fix it.
- If only the top side colours are out of line, you may just need the final U turn. U cannot fix wrong bottom stickers.
- If the bottom is still wrong, check whether you left out the final D, moved the bottom the wrong way, turned the whole cube between corners, or stopped before visiting all four positions.
- Also check the earlier checkpoints: a white face with mismatched side pairs, or a yellow corner in the wrong home, needs fixing before this final step.
If you know exactly which move you missed, undo the later moves in reverse order and correct it. If you have lost your place, use the 2×2 solver to get back to a solved cube, then try the small practice below. You do not need to take the cube apart.
Practise just this final step on a solved cube
Keep the same front throughout. This deliberately creates two twisted top corners while leaving the white layer solved:
- Do
R' D' R Dtwice. - Turn U once.
- Do
R' D' R Dfour times. - Turn U' once.
Check that white and its side pairs are still solved, and that the yellow corners are in their homes. Now follow step 3 from the start. This gives you a repeatable way to practise without rebuilding the first layer every time.
If you get stuck
- My white face is done but the side pairs do not match. Some white corners are in the wrong homes. Return to step 1. Judge a corner by all three colours.
- I keep finding two correct yellow corners. Try all four U positions. If there is still no position with exactly one or all four, do the step 2 sequence once, then check again.
- The bottom looks scrambled during the final step. That is expected before all four top positions have been visited. Keep the same front, finish each four-move group, and use only U to bring in the next corner.
- I finished but one corner still looks twisted. First check whether you stopped before the final D or changed the whole cube’s orientation. A single physically twisted corner is not fixed by normal turns, but do not assume that is the problem after a missed move. See cube troubleshooting.
If you know which move was wrong, undo it before carrying on. If you have lost your place, pause. Do not restart step 3 with a disturbed white layer: first restore the earlier checkpoints, or use the solver for a fresh start.
Learn to move one corner and restore your work
Try this once you have a solved cube:
- Hold white underneath.
- Do
R U R' U'once. Watch the bottom-front-right corner move up. - Leave the whole cube facing the same way. Find that white corner at top-front-right.
- Use the insertion group again, checking after each complete group, until that corner returns home with white down.
- Look at the other bottom corners. They should still be solved.
This is a small, repeatable exercise in protecting your work. You are not learning to move one corner alone. You are learning which other corners the full sequence restores.
Once this feels comfortable, try the complete 3×3 beginner guide. The corner ideas carry over; the 3×3 also has edges to solve. If you want a helping hand on a particular scramble, our 2×2 solver can supply a checked solution.
An original lesson and original diagrams by Solve My Cube. The corner sequences are checked against all 24 top-corner orders and all 27 legal twist combinations with the first layer solved. Prefer seeing hands as well as diagrams? J Perm’s beginner 2×2 video demonstrates a similar first-layer method. His final stage flips the cube and uses a different hold. Follow one complete set of final-stage instructions rather than mixing its moves with ours. You can also explore the official Rubik’s learning resources for another teaching style.
Ready for your next move?
Enter your cube’s colours and follow a solution at your own pace.
Open the cube solver